|
|
ENVIRONMENT CONTROL
Airflow is so often overlooked when building a hydroponic greenhouse or nursery and the importance of good air exchange and CO2 availability cannot be overstated. Airflow and CO2 can have a dramatic effect on the overall good health and performance of plants. An ideal environment requires at least 30 air changes per hour, therefore a good air mover (extraction fan) is paramount. More air movement is better than too little. To calculate the size of the fan you would need, measure the length x width x height of the area you will be using, then mutiply this figure by 1000. This will give you the cubic litre capacity of the growing space. Finally, divide this figure by 30 (which is the air changes required per hour) and this will give you the fan size required to change the air effectively. Equally as important as the extraction fan in the growing space is the intake fan. If the intake hole is too small you will create a vacuum and the extraction fan will end up fighting against itself and probably (over time) burn out. The intake vent (where the air comes in) should be 3 times the size of the exhaust vent unless the latter is also powered by a fan to draw the air in. A good gauge to see if your air exchange is right is to try and close the door to the greenhouse. If it's difficult then you need to increase the size of the intake or put a fan pushing air in as well.
Fluctuations in temperature can cause considerable problems in the growing environment. A temperature of between 23 - 27°C is desirable. Generally it may be difficult to maintain this temperature range, however as a general rule try to keep the greenhouse as close to this range as possible. Try also to avoid sudden leaps and dips in temperature as this can cause undue stress for plants. High temperatures of 30°C plus will cause the plants to sweat, (a process known as transpiration), whereby the plants lose water, and if unable to replace what is lost quickly enough, can lead to stress or even death. It is advisable to cut your nutrient strength by half if there is the possibility of an increase in the transpiration rate or hot weather is predicted, as the plant needs water, not nutrient. If temperatures fall below 15°C the uptake of vital mineral salts is impeded, creating a deficiency in the plant which is usually indicated by a purpling of the stem. To counter this a tank heater of some sort should be used as this will at least keep the root zone warm.
High humidity is another cause for concern, as dramatic fluctuations in humidity can cause bolting in the plants (stretching), blistering on the leaf surface, and mould problems on flowers. A humidity of 40 - 60% is desirable. Fresh air intake and good air circulation is absolutely essential to healthy plant growth and is a good way of keeping the humidity in check. By coincidence, plants tend to grow best in climates approximate to human comfort. If you visit your greenhouse and it feels like a fridge or a furnace, it's likely that your plants would appreciate you doing something about the situation. Masta Rule on site selection - when choosing a suitable location for your greenhouse, choose a site which faces east as this will avoid the intense heat from the afternoon sun. Alternatively, if you can't do this run your 'light on' times at night.
Carbon Dioxide (CO2) is one of the essential elements required in photosynthesis. Increasing CO2 levels is the most effective and immediate way to enhance and increase plant growth rates. Research by biologists and plant physiologists throughout the world have long recognised the benefits of higher CO2 content in the air for plant growth. Horticulturists and greenhouse growers have used CO2 generators to enhance growth rates on plants for many years with amazing results. Carbon dioxide is an odourless gas and a minor constituent of the air we breathe. It comprises only 0.034% (340 parts per million, or ppm) of the atmosphere but is vitally important to all life on this planet. Plants are made up of about 80-90% carbon and water with other elements being nitrogen, calcium, magnesium, potassium, phosphorus and trace elements making up only a small percentage. Almost all of the carbon in plants comes from this minor 340ppm of carbon dioxide in the air. By increasing the CO2 in your growing environment from between 1000 and 1500ppm you will provide very strong growth from the extra carbon dioxide the plants take in at these levels. With higher CO2 concentrations the stomates under the leaves that allow the passage of CO2 into the plant, will close slightly as their workload is decreased. This results in less water loss and more water usage within the plant. The plant cells work more efficiently with plant growth rates increasing from anywhere from 70 to 200%. Simple sugars like glucose provide plants with energy and are formed into the more complex plant parts such as carbohydrates, amino acids, protein, cellulose, leaves, roots, branches and flowers. The oxygen that all plants give off comprises about 80% of the earth's atmosphere which is used by humans, animals and all marine life on this planet. Without it, animal and human life would not be possible. The importance of CO2 and good airflow in the growing environment equates to about 75% of the plants total food source with the other 25% coming from around its root zone. It is critical to get your environment right or disaster will follow. The next question for the grower is how do you increase the CO2 levels in the greenhouse? There are three methods of doing this. These are injecting CO2 by way of bottled CO2 cylinders which you hire from the gas company, using L.P.G gas burners which while supplying heat also increase the CO2 levels in the environment and the third is by way of home made concoctions using yeast and sugar. I will go through each of these one by one and highlight the positives and negatives of using each process.
Any extra CO2 around the plant will help. I would suggest before attempting this, that you look at getting your air exchange in your garden correct before adopting any sort of CO2 injecting methods. If the air exchange is not correct, you can stress the plant. As for producing CO2 on a budget the manual way via a brewer's yeast mix, is an excellent alternative to a tank and regulator setup. Here's what you do.
Note - You need to release the CO2 above the plants, as it is heavier than air and will settle very quickly. When you see bubbles coming out of the hose in the water glass, you know it's working. It should keep producing CO2 for around a week or so depending on the size of your area. When the bubbling stops you will need to repeat the process.
By using this method CO2 is injected into the growing environment with a regulator, flowmeter and solenoid which in turn is connected to a timing device which periodically opens the solenoid to let the gas flow through to 'emitters'. The emitters are placed above the plants, because CO2 is heavier than air, the CO2 then falls from the emitters on to the plants. The plants in turn absorb the CO2 rich gas. Injecting bottled gas can be extremely effective because of the purity, however it can also be an extremly dangerous gas in enclosed areas, therefore never ever put the cylinder inside the growing environment. Always store the CO2 bottles outside the growroom as CO2 becomes unstable above 30 °C. You will need to supply a lot of information about why you need the gas to the company you hire then from, however if this is not a problem for you then the bottled gas method of injection might be suitable for you. Below is listed the bottle sizes and calculations you will need to make, to get the full benefit of using bottled CO2 gas. Your gas consumption depends upon the greenhouse volume, cycle time and light on period. If you have a large greenhouse, a short cycle time and an 18 hour lights on period, you are going to use a lot of gas, and cylinders will not last long.
CO2 gas bottles come in 3 sizes:
To know what levels are required as well as how much to add to achieve 1500ppm you need to calculate your greenhouse volume first, this is done by measuring the length x width x height. To calculate how much to add take the average background CO2 level of 350ppm then your desired CO2 level you wish to achieve, for example 1500ppm, which is 1500ppm (desired) minus 350ppm (background level) = 1150ppm needed to inject, you then take the cubic capacity x enrichment level = volume of CO2 required. If your flowmeter is in litres, there is 1,000 litres in 1 cubic metre, so multiply room volume by 1000 which will give you cubic litres. Now you know how much CO2 to add, you need to decide how often you want to release (release frequency), and how long you want to release (release period), In my opinion using any of the above methods without monitoring the actual CO2 levels in the environment is very hit and miss, and a CO2 infrared sensor is the only way you are going to get accurate CO2 levels consistently. Please follow these steps to calculate the amount of CO2 required for your grow area.
From this example outlined above, each cycle will inject 15 litres using the timer device to ensure a CO2 level of 1500ppm is achieved. When using a full D or G size cylinder, you must keep the cylinder vertical (upright) and not tilt or lay it down as this will also result in liquid transfer to the kit, causing damage as mentioned above. BOC Gases recommend restraining the cylinder to prevent it from falling over causing damage to the kit.
Room Size: approx 12' x 12' or 144sq. ft.
The chart below can be used as a guide to determine the flowmeter setting to achieve CO2 levels of 1,000ppm, 1,500ppm, and 2,000ppm respectively. The injection time assumes five minutes 'on-time' for the timer device. Please be informed that only gas withdrawal CO2, BOC Gases Agricultural Grade-gas code 200 Fogg should be used with our CO2 Greenhouse kits. Under no circumstances should customers use Liquid Withdrawal CO2 as it will damage the regulator and the flowmeter. BOC will not repair/replace these damaged kits due to breach of warranty.
Each burner uses 0.075 kg/hr of gas per hour. Twin burners will provide an atmosphere of approximately 1500ppm in a ventilated 15m x 15m area. Each burner produces 0.22 kg of CO2 per hour. The Grow Master is available in 2, 4 & 8 burner models. The unit incorporates an electric solenoid and pilot light to turn the unit on and off automatically. Ventilation is important in conjunction with CO2 generation and heating. The Grow Master heater/CO2 generator can be finely tuned using the gas flow regulation valve. CO2 being heavier than air will initially be lifted with heat to the top of the growing area then fall and disperse evenly through the plants. The burners on the Grow Master burn propane gas very efficiently. Each burner at maximum gas rate burns app. 0.075 kg/hr of propane. This produces 3.15 MJ (875 watts) of useful heat and 0.22 kg of CO2. Without allowing for factors as wind chill, excess number of air changes per hour, wind velocity and direction etc. etc. the above would give approximately 5-10 degrees celcius rise. In a greenhouse, enough ventilation may be achieved by heat convection through the fan outlet without it being operated. It must be stressed that it is dangerous not to have adequate ventilation as CO2 in high levels of concentration is harmful to humans. Poor ventilation can also be detected by build up in humidity which can be detected in several ways. Moisture on the walls; a "sweet taste" to the air when drawn in over the tongue or measured by a hygrometer. CO2 levels can be accurately measured with the use of disposable gas phials. Each growing area whether it be indoor or outdoor will have its own unique growing environment, therefore individual adjustment and some experimentation will be needed to find the right level for your garden. |
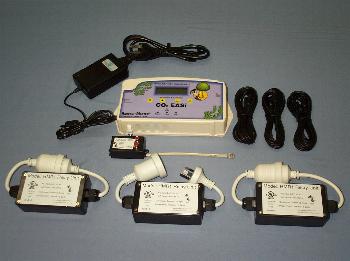 The ultimate plug & play environment controller! Get the maximum growth with the